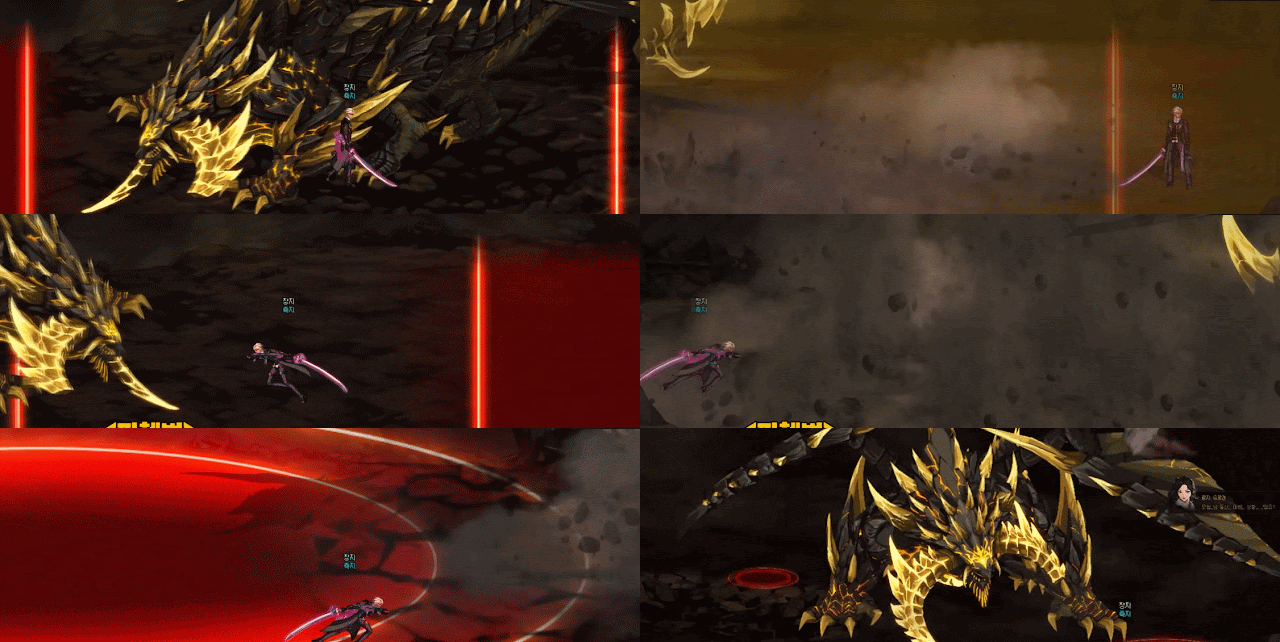
- Korean Name: 광룡 히스마
- This is one of the main Boss in Machine Revolution: WarPath. The unique debuff is to increase player's damage taken by 20%. This debuff can be taken off by defeating the mini-boss Sleepy-Eyed Rotund.
- In Bakal raid, if not defeated will create rockfall that causes stun and damage at regular intervals in Bakal.
Weak Points Gimmick
- "The scales that contain Hisma's power... I think they will be useful in battle if you use them well." - Rosa Jurgen
- You will see a target looking mark appears on a random body part of Hisma during certain patterns. Doing basic attack on the marks will drop scales. Getting the scales will give you buff of increasing attack by 20% and movement speed by 150%. However, you will get a debuff that increases player's damage taken by 20%.
Frenzy Gimmick
- "Looks like Hisma has gone berserk! Focus on dodging!" - Rosa Jurgen
- This is a pattern that is cast in all phases. At start of Hismar's fight, the frenzy gauge starts to fill up slowly, and when the gauge reaches 100%, frenzy pattern starts. Afterward you will get a small groggy.

- The attack speed of the overall pattern increases, and ground tremor is added as a follow-up hit to some patterns. This ground tremor is similar to Itrenok, The Green Dragon so for better timing, jump at about 90% cast bar.
- Keep in mind that the gauge fills up by about 15% each time you successfully attack a weak point, and resets when the neutralization gauge is destroyed.
- During this frenzy period, Hismar will cast various patterns that require you to dodge the red area on floor. Be sure to pay attention, especially the ground tremor. Below are some examples attack sequences.
Phase 2
- In this phase, Hismar has a additional donut-red-zone pattern that require you to jump and dodge 5 times. At this time, you can't hit Hismar so just focus on dodging.
Body Slam Pattern
- Hismar will knock you down first then do a body slam causing room wide damage. Use quick rebound to dodge.
Diagonal Body Slam Pattern
- Hismar will indicate the direction of the slam. Afterward, rocks will fall all around the map. The slam area will be our safe zone (after the slam of course).
- Full body slam will come after the diagonal slams, but this time with relatively smaller damage area.
Charge Pattern
- Hismar charges across the room twice. Dodge by staying on the opposite side if Hismar's directions.
- After the 2 charges, Hismar slams on the ground with relatively large damage area. This slam will knock you down. Hismar then do a raw that causes room wide damage. So use quick rebound after the knock down to avoid raw damage.
General Approach
- Hismar's attacks are relatively slow and self-explanatory. It will take a bit of time to get used to with the timing, especially with the ground tremor.
- Generally speaking, fight Hismar by grabbing the scale, deal damage while you can, when Frenzy gauge is 100%, focus on dodging.
- Be careful about grabbing Hismar last. Getting Hismar last meaning you have to deal with level 3 Dragon's Wrath, which increases dragon's damage by 30% and player's damage received by 15%. Add this to the scale debuff of player's damage received +20%, you can get one shot pretty easily. And if you don't kill mini-boss Sleepy-Eyed Rotund, oh buddy, you better have good dodging skill.
Bakal Raid
- Similar to Total War version, Hismar still throw lots of wide range attack at you. But this time, there is one special damage gauge gimmick. With Hismar's area attack, outside of the red zone, you will see a smaller yellow zone. If you stand in this area, your damage gauge will fill up.
- There are a total of 5 stages, and as this gauge goes up, your damage and received damage increase very significantly, and upon reaching the final stage, a 30% cooldown reduction buff is additionally granted for a certain amount of time.
Stage | Damage Increase | Increased Damage Taken | Cooldown Reduction (Including Awakening) |
0 | 50% | 25% | - |
1 | 75% | 50% | - |
2 | 100% | 75% | - |
3 | 175% | 125% | - |
4 | 225% | 225% | - |
5 | 275% | 225% | 30% |
Thorn Pattern
- Some party member will have a red beam on them. This beam will throw Hismar's rock on player's location and created a thorn area.
- These thorn doesn't hurt much. However, as you accumulate more damage gauge, you can die pretty quickly. It's best if you guide these thorn to land on the edge of the map.
Frenzy Gimmick
- Similar to Total War version, but here he will have a Cry bar. In phase 1, before activate his Frenzy gimmick, you will see a Cry bar in the middle bottom of the screen. If you stay in the same room as Hismar, your damage gauge will continue to fill up. It's a good idea to throw all our skill at him now.
- Right before the cry bar fill up, make sure you go to the next room to avoid the Frenzy attack. After the attach, Hismar fly to the next room and continue to fight.
- In phase 2 though, he will throw tons of attach at you, so just focus on dodging. Hismar will do a full body slam at the end, so hide in the green area.


.png)
.png)

.png)
.png)


No comments:
Post a Comment