


- Ozma raid is here, and it comes with 5 extra set to fuse with your current epics. Here I will simplify the effect of each set along with their pros and cons to help you pick which set is best for you.
- I don't play Sader and Aeterna much, so this post will mostly cater to DPS and Synergies. But for your reference, I'll put the stat summary and comments for Sader and Aeterna at the end.
Table of Contents
- Why Read This?
- For DPS / Syn
- Tiamat Set Summary
- Astaros Set Summary
- Rosenbach Set Summary
- Berias Set Summary
- Redmayne Set Summary
- Combination Example
- Summary
- For Saders
- For Aeterna
- References
Why Read This?
- Well, with Ozma raid, you get 5 sets, each contain 5 pieces, to fuse with your Shoulder, Shoe, Belt, Necklace, and Magic Stone.
- On top of that, each Ozma set has set option of 2-set, 3-set, or 5-set. So as you can see, just like level 100 epics, you can mix match multiple Ozma set to your liking.
- AND on top of that, Ozma has reroll option where you can add unwanted pieces and filter out what you want. So eventually, with enough effort, you can get any Ozma pieces you want.

- NOTE: Your Ozma reroll will reset if you collect the item. So you’ll have to do it all in one go to get the exact piece you want.

- NOTE: There are some RNG involved with Ozma Epic. Each Ozma piece will have a grade (Blue, Purple, Yellow). Each grade will provide different "Special Option" stat and there's no way to reset them (you will have to hope for another dup with higher stat).
- For example, Tiamat Shoulder that provide "Level 45 skill consume (9 / 7 / 5%) HP". That means if you get a blue version, the skill will consume 5%, purple version consumes 7%, and so on.
For DPS / Syn
Tiamat Set Summary

- Pros: This set has 1% higher modifier from the "Simple Option" than other set. Especially with the Shoes piece, it has 2% higher total modifier (1% higher Additional Attack and 1% higher Bonus Damage).
- Cons: Every time you cast a certain skill, you lose 5-9% HP. The cooldown is 10% but this can be a problem especially during longer fight or when you have lots of CDR gears.
- Good News: At 3-set option, the HP reduced is cut down by 5%. So now instead of losing 9/7/5%, you will lose 4/2/0% instead, which is great.
- Overall:
- If you want to get this set, the Shoes is a must.
- Try to get 3-set option to get the reduced penalty.
- Mix with other set that have utility.
Astaros Set Summary

- Pros: Huge skill level increases the more pieces you wear.
- With the 2-set option, you can type "Past" to activate that dimension. Think about if you get 2-piece of yellow version, you can activate +2 levels to skill 70, 75, and 80. Which is a huge damage increase.
- Cons: Highly RNG and you don't always get the version of the skill range you want.
- Overall: This set is very good if you know what skill range you want to activate.
- It's also hard to make a recommendation because every class has different skills, but generally higher level skill like 70 75 and 80 do a lot more damage.
- If you want to use this, I would get at either 2-set or 3-set option (maybe 3 Tiamat piece and 2 Astaros piece)
Rosenbach Set Summary

- Pros: Great utility set that give you a shield (20% of Max HP) and give you various buff if you get hit with the active shield. The 2-set option is great, increasing 1% HP/MP every 1 second.
- Cons: Nothing really.
- Overall: Best with 2-set utility option. Highly recommend the belt for movement speed.
Berias Set Summary

- The pieces give you a soul (Max Stacks: 1, Soul perish after 5 hits, Hit Cooldown: 2 seconds, Soul Respawn Cooltime: 20 seconds) on top of your character that give you buff.
- Pros: Great utility set like Rosenbach. The buff effects are great.
- With 2-set option, you can increase hit limit to 6 and reduced Soul Respawn cooltime to 15 second.
- Unlike Rosenback set where you have to get it to get buff, this set gives you buff right at the start.
- Cons: The set options fall short after 2-set.
- Overall: Good utility options. The Necklace is the only Ozma piece that give both Attack and Casting Speed.
Redmayne Set Summary

- Pros: Decrease skill cooldown by 10%, which can go great with other CDR strategy like Mind Stim Potion and Sirocco's Assassin Set.
- Cons: Decrease your max HP/MP by a huge amount.
- Overall: Great set. I would check how much CDR you have and weight your risk/benefit from there.
Combination Example
- 3 Tiamat (higher modifier) + 2 Redmayne (more CDR):
- Remember to get Tiamat Shoe for the 2% higher modifier.
- This combination is good if you already have epic set that already give utility (e.g. Crossroad set)
- 3 Tiamat (higher modifier) + 2 Rosenbach or 2 Berias:
- If you don't have a lot of utility, this is a good combination.
- If you don't care about the 3-set Tiamat that reduces the HP penalty, you can replace it with Berias belt to make up for those HP lost.
Summary for DPS/Syn
- Tiamat Set - Higher overall modifier, but comes with HP penalty.
- Astaros Set - Increase skill level at a rotation, comes with no penalty.
- Rosenbach Set - Create HP shield, gives buffs when you got hit.
- Berias Set - Give buffs right off the bat, and wears off after certain number of hit.
- Redmayne Set - Reduce skill cooldown, but comes with reduce max HP/MP penalty.
For Saders
Tiamat Set Summary

- Definitely has the strongest buff power, but doesn't provide any additional benefit through healing, resurrections, etc. (perhaps you can use this a swap set)
- If you're playing Enchantress, note that wearing all 5-piece will reduce Black Forest Barrier from 5 sec to 3 sec.
Astaros Set Summary

- Buff power is quite low compared to other. It offers no special benefit or penalty.
Rosenbach Set Summary

- Overall great balanced set. Buff power is not the highest, but provides huge additional benefits through special option. I fell like most sader would go with this set.
- Note that the barrier her is 5% of Max HP as compared to 20% for DPS/Syn.
Berias Set Summary

- This set only increase stat through passive skills, and doesn't add any buff power to level 30 and 50 skills.
Redmayne Set Summary

- Overall about the same power as Astaros set, although comes will penalty in healing skills.
For Aeterna
Tiamat Set Summary

- For simple option, you get total of 1,550 stat increase right of the bat.
- In addition to special option (assuming you cast all the required skills to proc the effect), you get another 1,250 stat, for a total whopping 2,800 stat. This set by far will provide the most stat.
Astaros Set Summary

- For simple option (just like Tiamat), you get total of 1,550 stat increase.
- The special option is RNG though, you get additional 375, 625, or 875 stat for a total of 1,925 or 2,175 or 2,425 stat.
- As you can see, the total buff is not as strong as Tiamat and has RNG involved.
Rosenbach Set Summary

- For simple option (just like Tiamat), you get total of 1,550 stat increase.
- For special option, it's pretty bad. Here you only get additional 100 stat. So I don't recommend using this set at all.
Berias Set Summary

- For simple option (just like Tiamat), you get total of 1,550 stat increase.
- This set definitely gives you huge attack movement casting speed. But again, it only provide additional 100 stat through special option.
Redmayne Set Summary
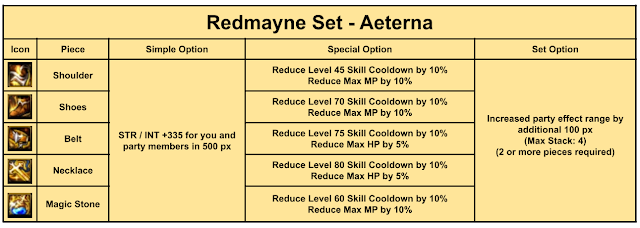
- Unlike other sets, this one gives you 1,675 stat through simple option.
- It gives you the highest simple option stat, but fails to provide any additional stat through special option.
Summary for Aeterna
- Tiamat Set - Higher overall party effects, but comes with HP penalty.
- Astaros Set - 2nd highest party effects, but comes with RNG.
- Rosenbach Set - Bad party effect, but high survival with the shield.
- Berias Set - Bad party effect, but gives huge attack movement casting speed.
- Redmayne Set - 3rd highest party effects, gives total 900 px party effect, but comes with HP/MP penalty.
References
Naver - Let's Fuse Ozma Epics
Dunpa Cast - Ozma Equip Summary
Changelog
- 1/2/2022:
- Changed icons for Magic Stone slots for Rosenbach and Redmayne pictures.
- 12/17/2021:
- Added clarification on Ozma reroll system
- 11/15/2021:
- Edited images to match DFOG version
- Added Sader comments
- Added Aeterna options and recommendation


.png)
.png)

.png)


No comments:
Post a Comment