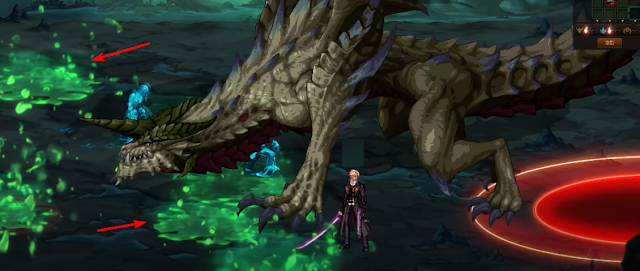
- Korean Name: 사룡 스피라찌
- This is one of the main Boss in Machine Revolution: WarPath. The unique debuff is to reduce poison resistance by 100%. This debuff can be taken off by defeating the mini-boss Impish Swan.
- In Bakal raid, if not defeated, drops poisonous chunks that cause poisoning damage at regular intervals at Bakal.
Poison Zone Gimmick
- You will see the "It appears to be a contaminated area of considerable viscosity. It will not be easily eliminated." from Rosa Jurgen.
- When Spirazzi cast patterns, he will create poisonous zone on the map. Stepping on these will deal poison damage to you over time. In addition to poisoning damage, the solo version also includes fixed continuous damage.
Blue Zombie Gimmicks
- You will see the "That polluted area seems to be absorbing other pollutants... if so..." and "The pollutants absorbed into the body seem to purify other pollutants... Then..." from Rosa Jurgen.
- There will be some mobs that look similar to blue zombies around the map. When the blue zombies are killed (usually by basic attack or skills), blue contaminants are created. If you stay still on this contaminants for 1 second, you will absorb blue poison that give you a buff.
- This buff allows you to clear out Poison Zone created by Spirazzi's attacks. Clearing Poison Zone with this will recovers a small amount of HP and MP without taking damage from the contaminated area. This buff will also give you +20% damage increase and movement speed increase.
Other Phase 1 Patterns
(aka basic-dodge-the-red-area patterns)
Phase 2
Miasma Eruption Pattern
- This activate immediately at the start of phase 2. Spirazzi flies up, removes all Poison Zone and spawns a horde of Green Zombies. When these zombies are killed, they left green orbs behind. Your job is to kills and collect all green orbs before Spirazzi's cast bar at the bottom runs out.
- In the gif below, the player has the blue zombie buff active, thus allowing him to kill green zombies just by touching them.
- If you don't have the blue zombie buff, you have to push these green zombie into Spirazzi's damage zone to kill them.
Writhe in Pain! Pattern
- This is a wide range attack pattern. Spirazzi first attack from top to bottom, them left to right. Pretty simple, just dodge red areas.
Obliteration Pattern
- Spirazzi does 2 body slam, then spawn spike on the outside (so run outside the circle, outside again, then inside). The last attack has wide range, so attack Spirazzi to reduce the damage zone.
General Approach
- Spirazzi's fight is not too difficult. Be sure to manage your blue zombie buff.
- The worst thing about this boss is the visibility of the map, especially in phase two with both blue and green zombies. So keep your eyes open.
Bakal Raid
Death Postpone Gimmick
- This can occur during some pattern or when HP reaches zero. The screen will turn gray, if HP reaches zero again, you die. You need to run around and find a Red orb and absorb it to get back to normal state.
Miasma Eruption Pattern
- Similar to its Total War version, you still need to collect the orbs. However, in this version, you need to go around the outer side of the boss map to collect the orb. Some map already have the orbs there, some map you have to kill the zombie. When the timer end, any orb left on the map will be absorbed
- The picture below is the location of which room has only orbs (left) vs which room has zombie (right).
- Spirazzi will have a poison gauge. The higher level this gauge is, the more poison damage. Each uncollected orb will increase by 20%.
- Usually sader can heal you good enough with poison level 2. Any level higher than that, you may issue surviving. On Spirazzi's phase 2, this pattern will start out with Death Postpone Gimmick, so find our red orb
- NOTE: When the timer is half way, Spirazzi emits powerful miasma to one of the left and right sides (for example below, you will see warning sign on the left side of the map).
- Below is one example of how to approach this:
- DPS1 and DPS2 go left and top, the top 2 corner
- DPS3 and Buffer go right, then down. Everyone move clockwise. DPS3 just kill mob and keep moving, Buffer stay behind and pick up the orbs.


.png)
.png)

.png)
.png)


No comments:
Post a Comment