- Like what you see? Do you want to learn how to make that for your Video/Twitch stream?
- What Program Needed?
- You will need 2 programs to create that transition: DnFExtractor & Blender
- In order to create it, first you will need the raw images from the game file, this is done using DnFExtractor. You can learn more about how to use and extract the images in this How to Use DnF Extractor article.
- After extracting the raw footage, Blender is the program used to put them together and finally render the final product. You can download Blender here blender.org/download/. Note that Blender is an open source program that you can make crazy stuff, what I'm about to show you is just the tiny tip of the iceberg.
Extracting the Footage
- Please be sure to read the article about how to use the Extractor before going forward.
- In this example, the file used was "sprite_character_fighter_effect_cutin.NPK"
- Within this file, you will find all the buff cut-in. They will have the name of "neo_buff" in the name, for example "fighter_striker_neo_buff.img"
- In order to understand this process, you need to understand how transition works. Really, in a nutshell, scene transition consist of 3 parts:
- Part 1: Come in - this part is where your transition start to take place out of nothing. This can come from any direct of the screen, e.g. from top bottom right or left. In this example, this transition will come in as a fade
- Part 2: Cover - a must have of all transition is that it has to cover the majority of the screen, if not all of it. When the transition cover the whole screen and pause for a spit second, this is the moment where you change to your next scene. For example: Start Scene > Whole Screen Transition > Gameplay Scene.
- Part 3: Come out - this is where your transition fade out, leaving the screen.
- Look at an example below, you start with scene 1, then the transition faded in, then covered the whole screen, paused for a bit while the scenes switch, then fade out, revealing scene 2.
- The key important of a good transition is a transparent background, and lucky for you, the extracted images from game files already have it.
- When you first opening Blender, it will look very intimidating, so follow these steps. First, choose the "Video Editing" option
- It will then open the video editing portion of the program, this is where you add the extracted image to make an image strip
- On the next screen, navigate to the folder where you saved all the extracted images and add them all. Tip: click on one of the image, then press "A", it will select all the file in that folder. After that , click "Add Image Strip".
- You see that I made multiple duplicate images in the folder, the reason is that I want my transition to run at 60 fps, so I just made enough duplicate (about 153 frames) to render about 2-3 second
- After adding the image strip, Blender will stretch the strip by default to fit the screen, which we don't want. In order to fix this, select the "Offset" check box at the bottom right
- After clicking "Offset", it will turn our strip into its original ratio, then go ahead and change the "Position X" option so that the strip will go all the way to the left edge of the review screen, you can click and drag too, making it easy to adjust.
- Then, go ahead and do the same procedure for the other 3 buff cut-in. Then use the same "Position X" on each strip to move them around to the location you see fit.
- As you can see, the cut-in only cover part of the screen, so the next step is to adjust the resolution of your final transition. Then change the frame rate to "60 fps"
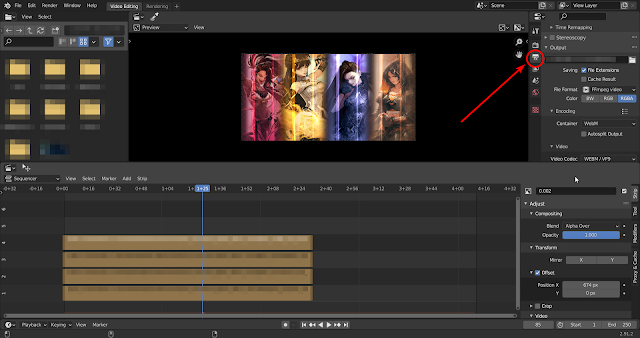
- Next, we need to change the file output, get started by clicking "Output Properties"
- In the "File Format", select "FFmpeg video".
- Next, in the Encoding Container, pick "WebM", this type of encoding makes the file extremely small.
- In the Video Codec, pick "WEBM/VP9"
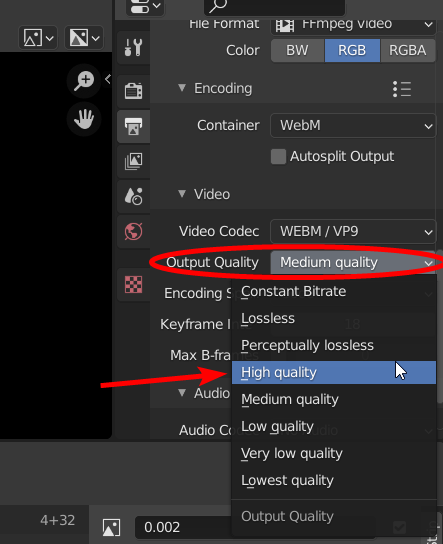
- In the "Output Quality", choose "High quality"
- Lastly, scroll all the way up to the "File Format" section and pick "RGBA" in the color option. The "A" stands for alpha, which make the file renderable in transparent enviroment.
- Then click on the folder icon to pick the location you want to save your transition
- Before starting to render, we need to adjust the total frame of the whole transition. As you can see, our image strips end at frame 151, but the whole transition is set at 250 frames (look at the bottom right corner). If you leave it that way, your entire transition will have 250 frames, but when it hit frame 151, the rest is just a blank screen.
- To fix this, simply click on the "end" frame, and change it to 151, that's it, your transition will now be 151 frames.
- That's all the setting, on the top left, select "Render", then "Render Animation" and let the program do its job.
- In this example, I'll show you how to apply it using Streamlabs OBS.
- Open the OBS, then click on the Gear icon.
- Select "Add Transition"
- Here select "Stinger" in the "Type" drop down.
- In the "Video File", pick the transition file that you just rendered.
- In the "Transition Point", this is where you choose the time when you want your scene to switch. I played around, and "1,300" milliseconds is a good time to switch scene because that's the time when the transition covered the whole screen.
- Click "Done", and that's it
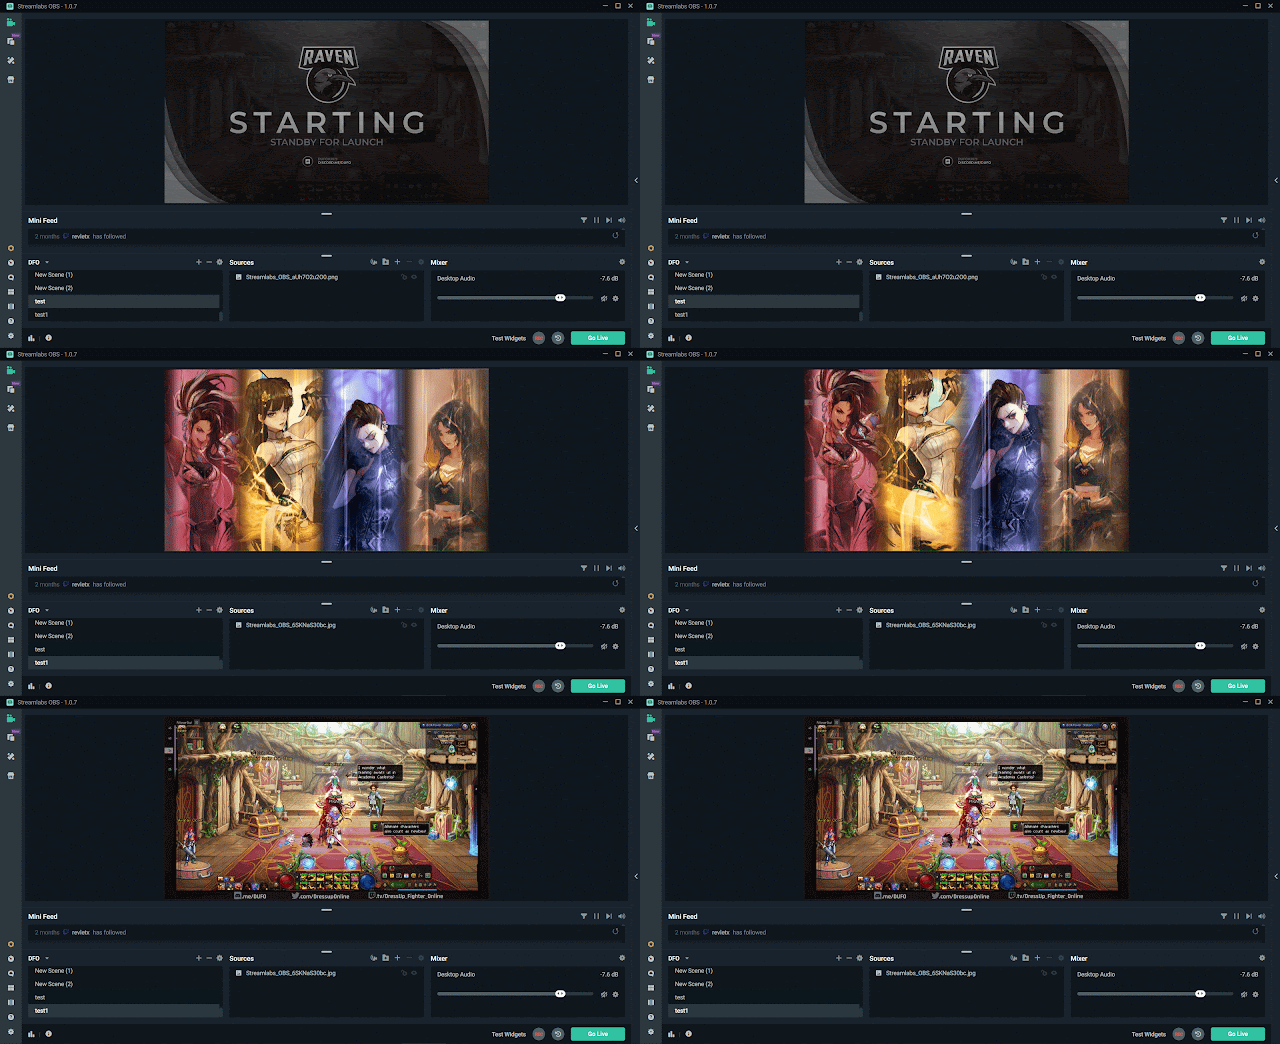
- Below is the final result when I switch between scene on my OBS.
- Again, this is one of the many possible content you can create with Extractor and Blender. Play around with the game file and see which type of image you can extract, then use Blender to create all kind of transition videos. Hope this article inspired you to make your own unique contents. Cheers.


.png)
.png)
.png)

.png)
.png)

.png)

No comments:
Post a Comment